Showing posts with label Nursery. Show all posts

Friday, 5 June 2015

Change table essentials & tour

Squidge's change table
Over the last few months since Squidge was born, we've managed to get our nappy change routine down to a T.  We've worked out what products we need, and which we don't.  With that in mind I thought I'd give you a little tour of his change area and go through what we use the most :)

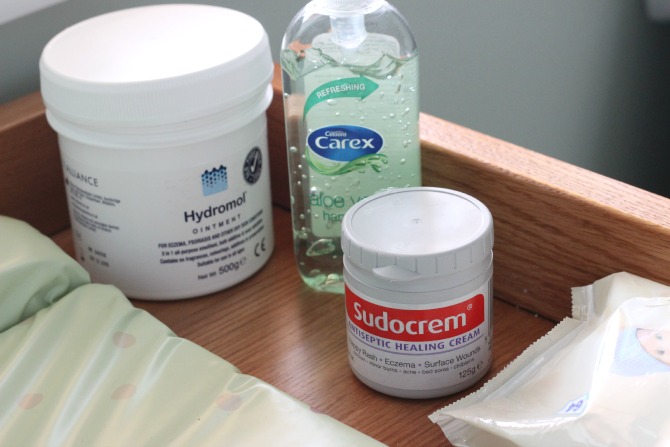
At the end of the table are the products we use the most, Hydromol for his dry skin/eczema (which is ok at the moment), some anti-bac for mummy and daddy to use after changing him (especially after a poop!), some Sudocrem for those sore/red bum cheeks, and some baby wipes - currently we're using up our stash of 'Huggies Pure' - having a look at the ingredients, they're pretty far from pure, so we'll be switching to Water Wipes when these run out.  The change table we have was from Mothercare, they've since discontinued it but if I recall it was about £170 - I wanted one that was a proper table with drawers and 4 closed sides.

Change table essentials

In the top drawer of the change table we keep his nappies, and stock of wipes (we're currently using Pampers Active Fit size 3+ nappies - when we've run out of these, he'll be going onto size 4), and his baby oil, spare Calpol and a couple other bits and bobs we're not really using at the moment.  This is the most used drawer :)

Contents of the top drawer of the change table

Middle drawer is where we keep our muslin cloths (clean ones), all the little samples you get when you're pregnant and a new mummy and our spare nappy bags (the Aldi Mamia ones are our fav, they smell amazing!).

Contents of the second drawer in the change table

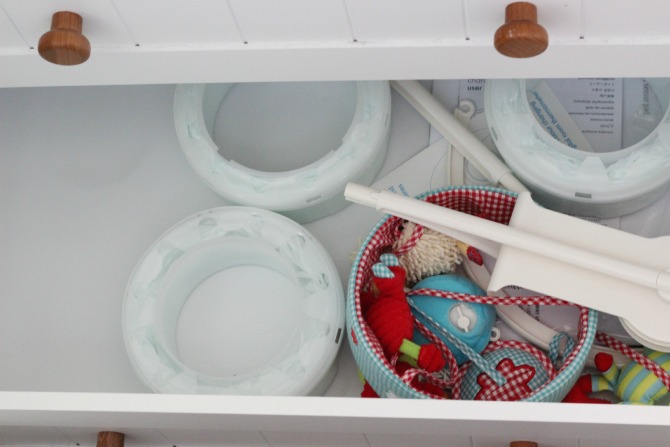
Then the bottom drawer, this is where we keep the refills for his Tommee Tippee Sangenic nappy bin (a must have!) - if only these were scented!  We've also put his cot mobile in here as we don't have it up above his cot any more.

Contents of the third drawer in the change table

I like to have it so that everything I need is right in front of me so that I don't have to leave him, especially as he is constantly trying to roll over when he's on the mat now (but I don't let him).  If I'm changing his clothes too - I put him or leave him in the cot while I pick out his clothes, I know he's safe then, and I place them by the change table, again, that way I don't have to step away from him.

Gosh, it was all so much easier when he was tiny, now he throws a tantrum almost every time we change his nappy, slamming his little legs and feet down several times in anger and screaming his little head off!

Monday, 24 November 2014

Baby boy bunting & giveaway

Baby boy bunting from Room to Grow beds

Baby boy bunting from Room to Grow beds

Baby boy bunting from Room to Grow beds

It's no secret that I'm a great fan of bunting.  I permanently have bunting up in my lounge and conservatory because I think it looks so happy and I love the traditional British vibes it gives.

It's no surprise that Squidge's nursery was likely to have bunting in it too, in fact, there are plans for him to have seasonal bunting (his Nanna is knitting some for him).

This set of bunting is from 'Room to Grow', a website that specialises in products and decor for childrens rooms and baby's nurseries.

This particular set is 200cm long (so, 2 metres) in the colours blue, red and green - including gingham, polka dot and striped and costs £15 which is pretty reasonable.

I love how it looks in his room, it definitely makes it more happy and I can't wait to decorate it with even more bunting, can you ever really have too much?

The lovely people over at Room to Grow have given me a second set of bunting (exactly the same as the one pictured) for me to give away to one lucky winner.  This giveaway is open to the UK only I'm afraid, you have to follow my blog on Bloglovin' and follow Room to Grow on Twitter - complete entries on the Raffletcopter widget below.  Good luck!  The giveaway will run for 2 weeks.

a Rafflecopter giveaway

Follow me on Google Plus | Bloglovin | Facebook | Twitter | Pinterest


*This post contains PR samples

Wednesday, 24 September 2014

The Nursery

The nursery has been a long work in progress.  It used to be our computer room where we both had a desk, where my large makeup collection was housed, and 2 bookshelves full of books and games. A few weeks ago we started clearing the room.  We moved the hubby's computer & desk downstairs into the lounge, gave my desk away, and moved the bookshelves downstairs (needless to say, our lounge is now very cluttered - we could really do with a bigger house).

Once the room was empty, we picked out some paint - Dulux Tuscan Glade 5 - it really doesn't show up well in these pictures, but in real life this is what it looks like.

Dulux tuscan glade 5
Our in-laws came over and kindly painted the room for us, then the next day they came over and fitted the wooden floor for us too, amazing!  Once that was done, progress was quite quick, we were able to put the furniture together and start filling it with baby stuff.  I still haven't managed to get all his clothes washed, but quite a lot of them are.

This pic is from the doorway (with the door on the left).  The cot is right in front, with the chest of drawers on the right and the changing table in the far corner to the side of the window.

The whole nursery
This is looking at the cot straight on - don't worry - that blanket won't be staying on when Squidge first sleeps in the cot, this is for when he's older, but I thought it was super cute and would look lovely in the couple of months before he sleeps in his room.
Full view of the cot
I didn't think there was room for a chair in the room - this is my old desk/computer chair.  But when the room was done, I was convinced I could fit in the corner.  Yeah there's not much room, but there's enough room to sit there and feed Squidge which is where I intend to go for the night feeds.  We just need to get a digital radio for the room for those night feeds.
Nursing chair and pregnancy pillow
This is why the change table is in front of the window, just to the side, so when I'm cleaning his poopy nappies, this is the lovely view I get (Caerphilly Mountain - it doesn't look crazy big as we're half way up it).
The view from the window
The change table - this was from Mothercare and is now discontinued.  The change mat I picked up from Boots.  And to the side is the Tommee Tippee Sangenic nappy bin for his poopy nappies, and maybe wee ones.  I have been quite disappointed with the Mothercare change table though - the quality really isn't very good - the drawers are very stiff and stick a lot, and the bottom one takes a lot of effort to get open.  I'm hoping they soften up with use, but I fear they're just badly made and expensive.
Mothercare change table
The cute light shade we bought for the room - we picked this up from B&Q and cost about £20 (there abouts).
B&Q lamp shade with owls and birds
We also fitted a couple of shelves above the chest of drawers, we matched the colour of them so they were similar to the floor and we've put lots of his toys up there - these will eventually be his to play with once he's the right age for them (some of which he will be straight away).
B&Q shelves with toys
His cot mobile - I bought this from Mothercare when it was half price (£12.50 instead of £25) - it had great reviews, one of the things people loved about it is that it's wind up.  It plays music and rotates, very cute and I love it.
Mothercare cot mobile
A collection of his teddy bears in the cot - two of which are lovely Jellycat toys - a Giraffe and his Bedtime bunny.  The blanket is from IKEA -with little woodland creatures on it, so cute!
The cot
His chest of drawers, FULL of clothes and bedding etc - these are from IKEA and are the Hemnes ones, the white glossy set (about £100).  Compare these to the Mothercare change table, and these are fantastically made - the drawers open smoothly and shut easily, with no effort - worlds apart from the change table!
IKEA Hemnes chest of drawers


And finally, his hospital bag all packed (we're having one each).  There's about 14 nappies in there, a pack of Waitrose baby wipes, a teddy bear and a range of babygrows, socks, hats and scratch mittens, and his going home outfit.
baby change bag packed for hospital

So there you have it - his nursery is finally complete!  The only thing left to do is for me to create a couple of paintings for his room and then put them up.  We were thinking about getting a rug for the room initially, but I don't think it needs one and in all honesty, there isn't really room for one.

It's a shame the camera didn't pick up the colours on the walls that well, but you can see in the swatch at the top just how pretty the colour is.  I didn't want to go for the typical 'blue' for a boy, same as the room wouldn't have been pink if we were having a girl.  I love that this is an earthy green, it reminds me of the woods, pixies and nature.


Don't forget to follow my blog with Bloglovin for regular updates :)

Friday, 16 May 2014

Project nursery #1

nursery inspiration

At the weekend I was back home in Pembrokeshire visiting my Step Dad.  When I was there I was helping to sort through some of mums old stuff and go through some old boxes, and I found some of my old sketch pads.

To give you a bit of background, I've always drawn, and I'm pretty good at it.  I used to do pet-portrait commissions, I studied art at college and went on to do Graphic Design at uni.  Drawing and painting is something that if you cut right through me, would be there - it's who I am.  I haven't drawn in a while though as I've been lacking inspiration.

But after going through all my old sketch pads I had the 'urge' again.  So I thought I'd start up my first project for the nursery - I'm going to draw & paint some cartoon characters, some are ones I love, like Totoro from My neighbour totoro and Jiji (the cat) from Kiki's delivery service.  And others are ones that I think Squidge might like, i.e. Peppa pig.  Each will be a square, about 10"x 10" - they'll be framed and arranged on the wall in the room :)

I had toyed around with the idea of painting a big mural on the wall, but I prefer this idea, it's a bit neater & I can change it up more easily.  What I might even do, is a big totoro on a tall narrow frame, and then lots of smaller square ones to go around him (I'm a little bit obsessed with Totoro - in fact, I have one sitting behind my laptop) :)

As I create each picture, I'll do a blog post so you can see it, and eventually when the nursery is done (months away!) I'll do a little nursery tour so you can see them on the walls :)


Follow my blog with Bloglovin

Blog design by srslydsgn | 2014 | all rights reserved